The variety of cutting tools available for modern CNC turning centers makes it imperative for
machine operators to be familiar with different tool geometries and how they are applied to
common turning processes.
This helps to identify different types of turning tools and their uses.
Introduction
Turning generates axially symmetric shapes with a single-point tool. A single-point tool removes
material by means of one cutting edge. In most cases the tool is held in a fixed position with the
workpiece rotating about a turning axis. There are also tools held on the spindle centerline
(drills, reamers, taps) for hole-making applications that have speed and feed limitations.
Audience
This class is intended for entry-level turning operators. This is also useful to anyone interested in the metalworking industry who wants to gain knowledge about material removal in CNC machining.
Purpose
Learn how to identify the components of common turning tools and how those tools are used
in every day turning processes. They are introduced to ANSI turning insert nomenclature,
tool holders and boring bars. They also learn about tools used for centerline machinings such as
twist drills, taps, and reamers. Students finish with an introduction to the concepts of spindle
speeds and feed rates.
Lesson Objectives
At the end of this lesson, you will know how to:
- Identify the components of common turning tools
- Identify the basic shapes of turning inserts
- Identify basic tool holders for external and internal turning
- Identify common types of tools for drilling and threading
- Identify the main groups of cutting tool materials
- Understand the applications for common turning tools
- Understand the difference between cut speed and feed rate
- Understand the difference between Revolutions Per Minute (RPM) and Constant Surface Speed (CSS)
- Understand the difference between Inches per Revolution (IPR) and Inches per Minute(IPM)
Anatomy of a turning tool
Most turning is done using a replaceable insert that is gripped in a turning tool body, which is then mounted on the lathe turret.
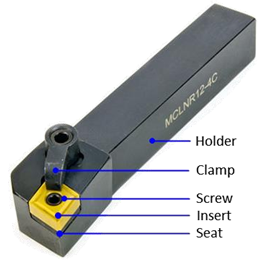
Standard Inserts
Turning inserts employ highly engineered composite structures, coatings, and geometry
features to achieve great accuracy and high material removal rates.
The benefits of using replaceable inserts for turning tools include:
- Some inserts can be indexed to use other edges when one becomes worn
- Inserts are quickly and easily replaced at the machine
ANSI Insert Designations
The American National Standards Institute (ANSI) has developed a coding system of numbers and letters to describe the shape, dimensions, and important parameters of turning inserts.

1.Insert Shape
Turning inserts are manufactured in a variety of shapes, sizes, and thicknesses. The shape
can be round to maximize edge strength, diamond-shaped to allow a sharp point to cut fine features, square, or even octagonal to increase the number of separate edges that can be applied as one edge after another wears out.
- A = parallelogram 85°
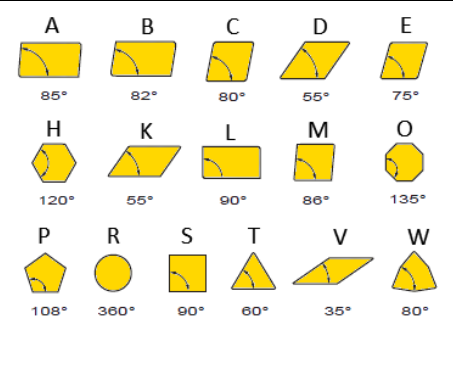
- B = parallelogram 82°
- C = diamond 80°
- D = diamond 55°
- E = diamond 75°
- H = hexagon
- K = diamond 55°
- L = rectangle
- M = diamond 86°
- O = octagon
- P = pentagon
- R = round
- S = square
- T = triangle
- V = diamond 35°
- W – trigon 80°
C and W type turning inserts are often used for rough machining due to their larger point angle, which makes them more rigid. Inserts with a smaller point angle, such as D and V, are often used for finish machining. Although they have less strength, the smaller angle can reach more part details.
Large point angle:
- Stronger cutting edge
- Higher feed rates
- Increased cutting forces
- Increased vibration
Small point angle:
- Weaker cutting edge
- Increased access to part details
- Decreased cutting forces
- Decreased vibration
2.Clearance
Most inserts have drafted faces on 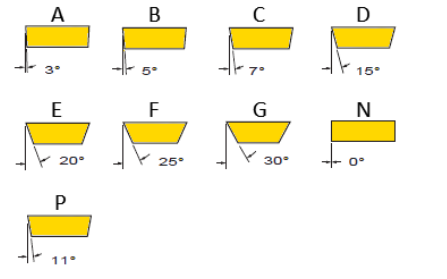
the walls. Clearance prevents the
walls of the insert from rubbing
against the part, which will
give poor machining. However, a
turning insert with a 0¡ã clearance
the angle is mostly used for rough
machining.
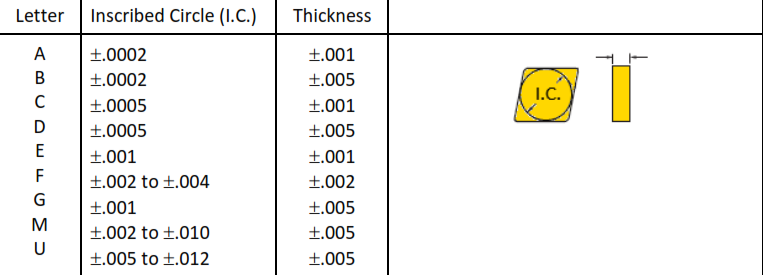
3. Tolerance
 4.Type
The turning insert hole shape and chip breaker type.
- A = Cylindrical hole
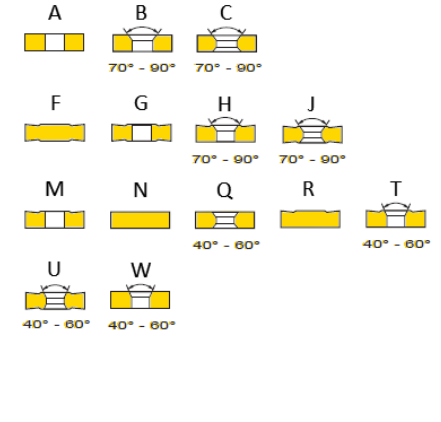
- B = 70-90¡ã countersink hole
- C = Double countersink
- F = No hole; Double-sided chip breaker
- G = Cylindrical; Double-sided chip breaker
- H = 70-90¡ã countersink; Single-sided
- J = Double countersink;Double-sided
- M = Cylindrical; Single-sided
- N = No hole; No chip breaker
- P = Cylindrical; Hi-Double-Positive Chip breaker
- Q = 40-60¡ã Double Countersink; No chip breaker
- R = No hole; Single-sided
- S = Cylindrical; Hi-double positive
- T = 40-60¡ã double countersink;Single-sided
- U = 40-60¡ã double countersink;Double-sided
- W = 40-60¡ã double countersink
- X = Special Design
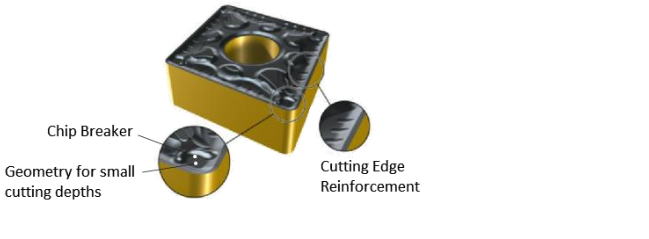
4.1. Type
A chip breaker is a feature in the face of the insert that disrupts the flow of chips such that they break into short segments, rather than forming a long, stringy chip.
5. Size
This numeric value tells us the cutting edge length of the turning insert.
For equal-sided inserts 1/4” I.C. or over:
Size = Number of 1/8” increments.
Examples:
2 = 1/4″
3 = 3/8”
4 = 1/2″
For equal-sided inserts less than 1/4” I.C.:
Size = Number of 1/32” increments.
Examples:
2 = 1/16″
3 = 3/32”
4 = 1/8″
For rectangles and parallelograms, 2 digits are necessary (Width
and Length).
Digit 1: Width in 1/8” increments
Digit 2: Length in 1/4” increments
Example:
12 = 1/8” x 1/2″
Important: The depth-of-cut for roughing should never exceed 1/2 the inscribed circle of the insert.
6. Thickness
This value tells us the thickness of the insert.
For inserts 1/4” I.C. or over: Thickness in 1/16” increments
For inserts less than 1/4” I.C.: Thickness in 1/32” increments
7.Corner
The form on the corner in 1/16¡± increments for inserts with a corner radius.
To reduce vibration, it is often an advantage to choose a nose radius that is smaller than the depth of cut.
0 = Sharp corner (.005R)
1 = 1/64” radius
2 = 1/32
3 = 3/64
4 = 1/16 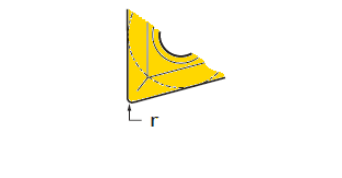
5 = 5/64
6 = 3/32
7 = 7/64
8 = 1/8
10 = 5/32
12 = 3/16
14 = 7/32
16 = 1/4
Large nose radius:
- Increased feed rates
- Large depths of cut
- Strong edge security
- Increased radial pressures
Small nose radius:
- Small cutting depths
- Reduced vibration
- Weak cutting edge

Leave A Comment