Features:
- Set Image, coordinate positioning, central origin positioning, the infrared fast search measurement point of the multi-functional optical projector.
- Simple operation, powerful function, high accuracy.
- Provide the most accurate and cost-effective assistance to the tooling process.
- In order to reduce the precision error caused by the second clamping, the traditional ring process of assembling and disassembling parts repeatedly is integrated.
- More efficient, more accurate.

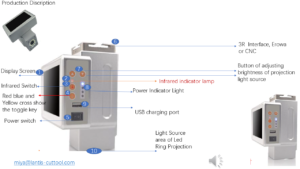
- Display Screen
- Infrared indicator lamp
- Infrared Switch
- Red blue and Yellow cross show the toggle key
- Power switch
- 3R Interface, Erowa or CNC
- The button of adjusting the brightness of the projection light source
- Power Indicator Light
- USB charging port
- The light Source area of Led Ring Projection
Production Introduction:
- The Red Laser quickly finds the measuring point and adjusts it to the clearest display.
- After the clear state, according to the screen crosshair center point to determine the measurement point, and then move the coordinates of the machine to get the corresponding number.
- Can also be based on zoom display after the observation of the workpiece processing.
- Easy install and operate, directly measure the related dimensions of finished parts.
- no need to disassemble the parts, reduce the repeated clamping error, can effectively improve the processing efficiency.
- can measure the large-scale parts according to the travel of the machine, can better achieve the processing accuracy.


Production Introduction:
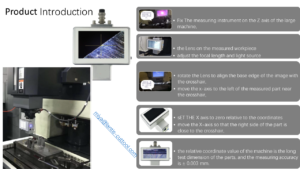
- Fix The measuring instrument on the Z-axis of the large machine,
- the Lens on the measured workpiece
- adjust the focal length and light source
- rotate the Lens to align the base edge of the image with the crosshair,
- move the x-axis to the left of the measured part near the crosshair,
- sET THE X-axis to zero relative to the coordinates
- move the X-axis so that the right side of the part is close to the crosshair,
- the relative coordinate value of the machine is the long test dimension of the parts, and the measuring accuracy is ± 0.003 mm.

Leave A Comment